Friday, July 6, 2012

It's My Turn, Woo Hoo !

I hope you have been enjoying the Red, White and Blue Blog Hop. I have found sew much inspiration from these amazingly talented quilters! (This is just the beginning, there is LOTS coming in the next few days, so stay tuned!)

I'm new at this and learning "how to" from reading Madame Samm's SewWeQuilt and SewIQuiltNow blogs. She is amazing and has amazing quilters guest blog as well as host these fun hops. I also want to thank all the wonderful quilters who have already participated in this hop. I have found sew many new ideas and I am very excited to try them all!

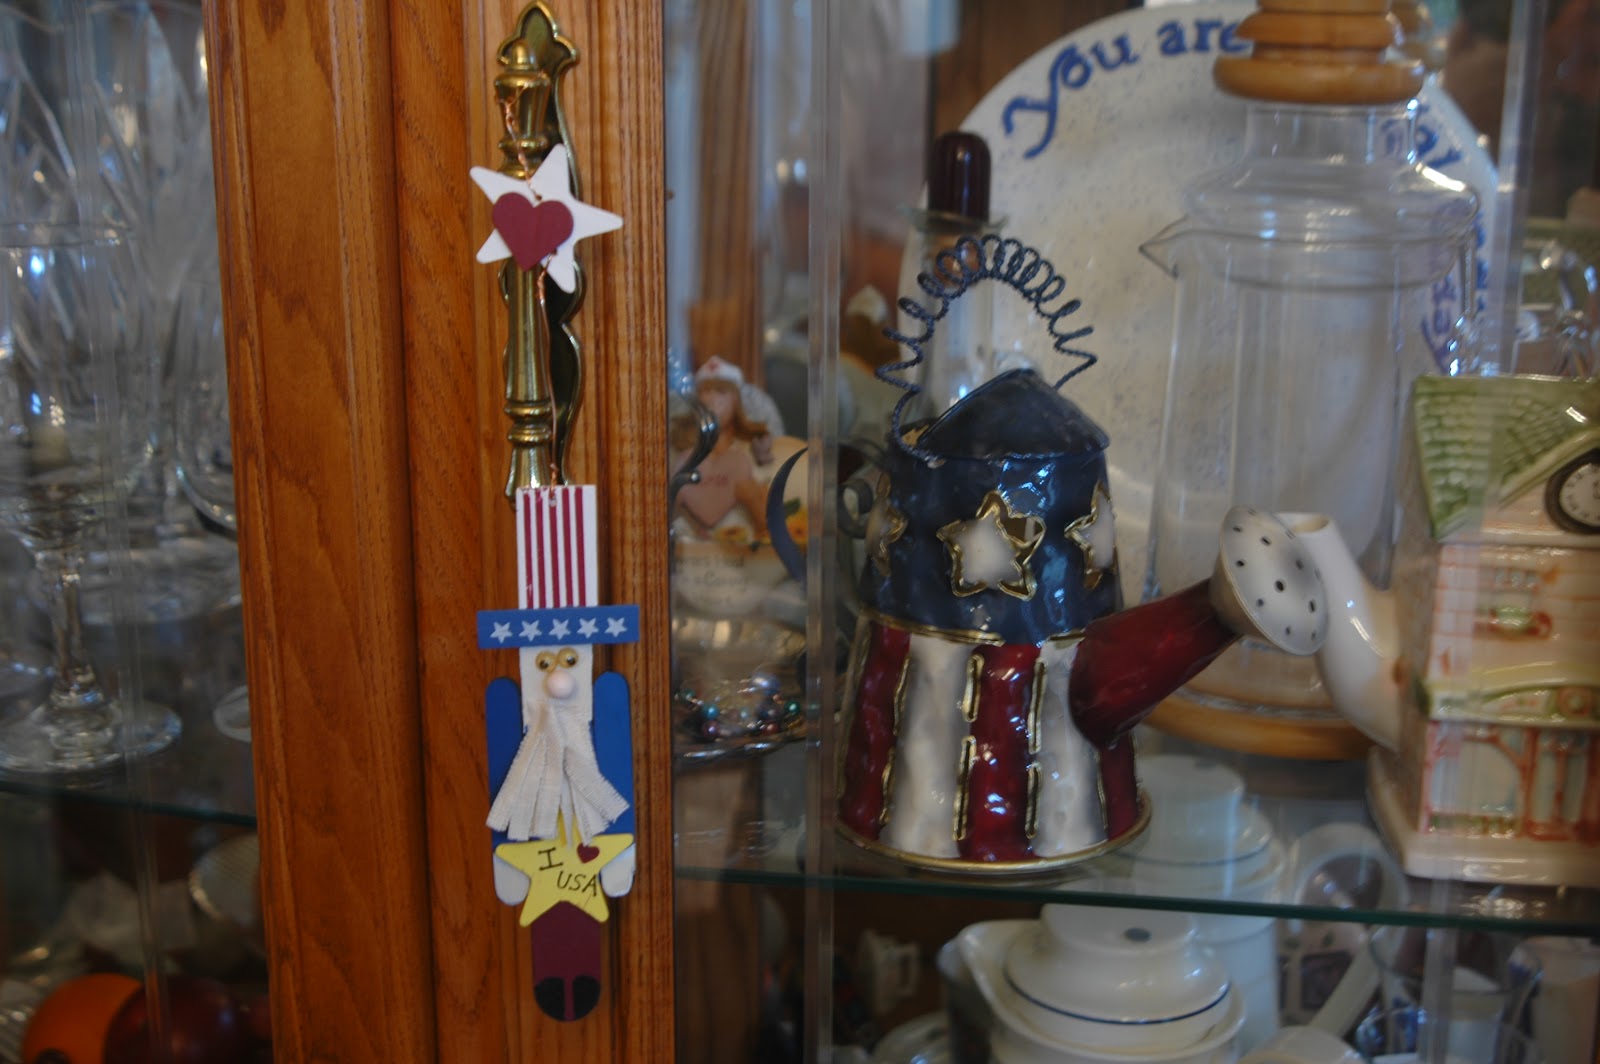
Now I must tell you we like the patriotic in our house! We have lots of random patriotic things scattered throughout the house from Memorial Day in May until Labor Day in September. (that includes "D day" commemoration June 6th, Flag day June 14th and of course the 4th of July).  It's great to have everything patriotic for such a nice long time.  We have patriotic kitchen towels and wood wreaths, paper pinwheels and tin watering cans. From wooden Uncle Sam doorhangers and styrofoam hearts to TY babies that represent the Democratic and Republican Parties, to a patriotic dining table, we have a bit of everything.


Which of course made me want to participate in the RWB blog hop.
I have a few blocks to share with you. The first blocks I ever made as a wantobe quilter I sent to a lady who requested blocks for a military quilt. She requested patriotic stars. This is what I sent.

This next block I designed around the fabric I had in my stash. It was leftovers from a placemat project. The original squares were 2 1/2 x 4 1/2.  I added 2 1/2 x 2 1/2 squares of white and blue/red stars and a blue/red star border to finish the block. The words around the eagle say "God Bless America, Land that I Love" and the words in the red/white flag stripes are "It's red for love and white for law and blue for the hope that our forefathers saw, of larger liberty"


My inspiration for my next block came from the design wall in my sister's quilt room. I saw this hanging in her room and loved the design. (She didn't)  I asked her if she had a pattern for it and she told me to take it off her wall and keep it. (I guess she doesn't intend to repeat that one!). I knew when the RWB blog hop came about, that I wanted to try that design. (of course being a wantobe, I sometimes get myself in over my head)  I chose the fabric, very excited about the colors and the stripes. THEN it dawned on me, I need to rethink the HST sizes because her block is only 9 inch unfinished and I need 12 1/2" unfinished. Ok then, let's go back and try to remember how to do the conversion. Yeah, I think I've got it solved. I started to cut out the HST's. OH MY! you have to be careful! If you aren't, the stripes end up going the wrong way! Glad I caught that before I made a mistake! I had to make a drawing of the block so I would make the squares correctly. I used the "June Tailor Perfect Half-Square and Quarter-Square Triangles" ruler which takes 2 squares of fabric and turns it into 2 HST's. I've used it before and it's terrific. (just takes a bit of planning when there are stripes involved and a design that has the HST's twisting and turning). I am very happy with the way it turned out!


I know many of you hop along in hopes of a giveaway. Unfortunately, until I am a bit better at this, I won't be giving away any of my attempts. I hope to be good enough to do a giveaway some day soon, maybe for the Bowls Blog Hop (coming soon!!). A big THANKS to Madame Samm and Lady Jane for this wonderful, inspirational blog hop. We all owe you a big debt of gratitude for all you do.

Thanks for visiting and be sure to hop over to all the others on the list!

July 6th


July 7th


Diane P (we host)


July 9th


Quilted Sisca (I will Host)


July 11th

Nancy R


July 12th


July 13th


Kathy H (we host)


July 14th

Diann C (we host)


July 15th


July 16th
PolkaDotClassic


Thursday, July 5, 2012

Mom's Birthday

I love my Mom dearly.  She was a wonderful Mom to grow up with. She is very talented in sewing and crafts. She made most of our clothes when we were kids (there are 6 of us). She also made my Dad's shirts and her own clothes. Costume for Halloween? OK. Fancy dinner? Need a nice dress? No Problem! Prom? What kind of dress do you want? She even made my wedding dress. I picked out the pattern and fabric, put in in the mail to her and it was just as beautiful as I had imagined. She is also very good with crafts and we always had the cutest (or scariest for Halloween) decorations for the holidays. She is a good cook too. Nothing fancy, but the best pot roast or meatloaf around and nobody does mashed potatoes like Mom. She even made sure we knew how to sew and cook. I still think I was very lucky to be born into my family. We might be a little quirky and we might like to have animated discussions, but we all love each other and are there for each other.
Talking about quirkiness (is that a word??), my Mom HATES with a passion, to celebrate her birthday. Not really sure why that is, but it is. Despite that fact, I just can't completely ignore her birthday. I have long ago realized I dare not buy a gift (she will be downright mad if you buy a gift), but since I make handmade cards I send her one each year. It almost never says "Happy Birthday" 'cause she definitely would take offense, but it usually suggests it. I was at a scrapbook convention a couple weeks ago and saw some awesome rubber stamps. I just couldn't resist. So I bought a few and used them to make a card for my Mom. This lady was just irresistable. I had to have her for my Mom's card. Take a look:


(notice it says Have a Wonderful Day.....no mention of birthday)

I think the window stamp is awesome and I look forward to making many cards using it. If you like it too, the company that makes it (and bunches of other cool stuff) is Art Impressions. The lady is called Birthday Girl F&B and the window is called Garden. You can find them at www.artimpressions.com
They have no idea that I am blogging about them, but they deserve the credit for these!

Thanks for visiting and I hope you will be back for the Red, White and Blue blog hop where I get to show off my stuff tomorrow (There is a blog hop schedule on my previous post and I will post the remainder of the hop schedule tomorrow).

I can say it here (since Mom doesn't ever use a computer and she won't see it): Happy Birthday, Mom !!

Sunday, July 1, 2012

Blog Hop Schedule!!

Are you ready for some FUN??
Join us for the Red, White and Blue Blog Hop!

Just click on the links below and follow along for some Red, White, and Blue inspiration.
You can also find the schedule by clicking on the Blog Hop button to the left or by going to
Jane's website (she is our fabulous blog hop host) at   janesfabrics.blogspot.com

July 1st

July 2nd
Elaine (we host)

July 3rd
July 4th
July 5th

July 6th
Scrapbook-ChickADoodle (that's me!)

July 7th
Diane P (we host)

July 9th
Quilted Sisca (I will Host)

July 11th
Nancy R
July 12th
July 13th
Plum and June
Kathy H (we host)
July 14th
Diann C (we host)
July 15th
July 16th
PolkaDotClassic

Friday, June 29, 2012

Birthdays and Babies

Well it's that time again, birthdays and babies.  Time to design again. Here you have it : one boy card, one girl card and a baby card.  Hope you like them.


Thanks for visiting, have a Wonderful weekend!


P.S. Don't forget the Red, White,   and Blue Blog Hop starts Sunday, July 1st !


Monday, June 25, 2012

Mod Podge Fun!

I was asked by Michaels to come in and teach a Mod Podge Make it-Take it yesterday.  I haven't used Mod Podge  for a long time.  So I played around with it, making a key ring and a luggage tag.  What fun and I think the results are great.  Take a look.......
Key Ring front

Key Ring back

Luggage Tag front
Luggage Tag back

These are acrylic shapes that I Mod Podged with images cut from paper (I didn't even  know they made special Mod Podge paper). On the words travel, inspire and dream I used Mod Podge Dimensional that leaves a raised area wherever you put it. I photographed it before it had a chance to completely dry so that you could see it in the photo. It dries clear or with glitter depending on the type you use. I used clear on both the luggage tag and the key ring (but forgot to photograph the key ring while wet, so you can't  see it in the photo). You could easily use scrapbook paper and other acrylic shapes to add to shadow boxes,  SMASH books, and scrapbook pages.

Thanks for visiting!

Monday, June 11, 2012

Classes on Sale !

All paper crafting and scrapbooking classes are 25% off at Michael's. It's their Beat the Heat promotion in U.S. and Canada. You have to sign up and pay for the class by June 23rd, but it's good for any classes that are scheduled. (in my local Michaels, that includes all classes til the end of August !).

Thursday, May 31, 2012

Let's finish up my May Madness

I wanted to send thank you cards for the lovely Table Top Quilts I won.


Since it's the end of the school year, I received a couple of gifts: a really nice altered clipboard and a giftcard to a frozen yogurt shop. I made a couple thank you cards, one with a coordinating envelope.


Altered Clipboard Card


I also made a gift of photos for a mom who missed seeing some school activities of her daughter. I got this idea from a neat website Thoughts of a Cardmaking Scrapbooker. Her link here:  http://chelemom.blogspot.com/


This is made from an empty ribbon spool, decorated inside and out with scrapbook paper, handmade and punched paper flowers and cricut cuts. The ribbon holds photos that accordian fold into the middle of the spool. Simply Adorable!

I think that's it for the month. Nothing to show for quilting (have to keep my work under wraps until the Red White and Blue blog hop).  Thanks for visiting!

Monday, May 28, 2012

It's been SO busy, it's hard to think of where to start..

May has been a super busy month and we have been home all month (no camping this month til Memorial weekend). Sure didn't expect to be so busy. Figured "being home" would mean relaxing,  catching up on scrapbooking and quilting, watching a few movies on DVD, read a book.... Wow was I wrong! It started with the church annual dinner dance auction.  It's a fun, black tie optional affair. We love to dress up for it. No stress, the dress and tux were back from the cleaners, so just get ready on Saturday and go. There is a silent auction for desserts during dinner, followed by a large silent auction for things like box seat tickets, and 2 weeks in a condo in Florida. There is dancing with a band and casino action. Just lots of fun for a good cause. Little did I know that on Thursday before the dinner, my friend would tell me she was now in charge of the dessert auction and needed a few extra desserts.  Guilt trip! Ok, I don't work on Friday, so I guess I can make some desserts and shop for some fancy containers to put them in.....mini Cream puffs in a decorator "book" with a French design, Madame Samm's chewies in a brown leather suitcase (2 layers), and a Mocha Praline Crown (fancy name for large cream puffs with chocolate filling instead of custard).

We had a great time til the wee hours of Sunday morning, then slept in on Sunday. Unfortunately nothing else was accomplished.

I Won!! Twice!!
I received 2 awesome table toppers in the mail! Giveaways from Madame Samm's blog hop! They are absolutely wonderful!  Cherry and Thearica did a great job and I'm proud to have them displayed in the house. Thearica made the rose one that is on the fireplace in our bedroom and Cherry made the Spring one that is in our dining room. Cherry sent the extra coordinating fabric that you see below the table topper. I'm excited to come up with something creative for that! It's hard to see in the photo, but the Spring table topper has awesome FMQ! Even my DH noticed! (up until now I've only done stitch in the ditch, so he hasn't seen the beauty of FMQ. He was very impressed.) Thanks ladies!


Along with all of that was Mother's Day and 3 grandchildren's birthdays and a double bridal shower at work. I'm glad I made the Mother's Day cards way in advance as the girl in charge of decorations for the bridal shower asked me to make centerpieces. (9 small tables with 1/2 bride and grooms and 1/2 bridal cakes, as well as a large bride and groom for the gift table and the cake table). It was lots of fun and they turned out nice.


Next, make 3 birthday cards for the grandkids. One for my 12 yr old granddaughter, 10 yr old grandson and 6 yr old granddaughter. It's fun to make cards they enjoy.


Time to close this post.  I'll try to finish showing the rest of my May Madness soon.

Thanks for visiting.


Sunday, April 29, 2012

Mother's Day is fast approaching!

I enjoy making handmade cards. Mother's Day is almost here, so it was time to design a card to send to my Mom and my Mother-in-law.
I started with 8 1/2" x 11" piece of white cardstock folded in half for the card.  Using a 5" x 8 1/2" piece of pink cardstock, I punched around using Martha Stewart's Deco Shell corner punch and edge punch. On the 3 1/4" x 5" piece of yellow cardstock, I used just the corner punch. Then I topped it with a  3 1/4" x 3 1/4" piece of pink cardstock punched using both the corner and edge punch. I wanted to try a new edge punch I had purchased that could also be used to make flowers. It's called Dimensional Flower by EK Success. I punched 2 pieces of 11" marroon cardstock, glued them on top of each each other 1/2 petal off center and twirled on a pencil into a spiral. The yellow flower centers are yellow cardstock cut with Martha Stewart's fringe scissors and twirled into a spiral. Flower stamens were added to the center. The wording "Mom" and "Happy Mother's Day" were cut with the Cricut cartridge Mothers Day, using the marroon and yellow cardstock.  A 1" x 11" piece of pink cardstock was edge punched  and attached inside the card as a decorative finish.  I hope you like the results.

inside

Thanks for visiting.

Tuesday, April 24, 2012

Table Topper Blog Hop....My Turn!

Thanks Madame Samm for hosting this fun Blog Hop. I just started learning about quilting when Madame Samm had the Wantobe Quilters Campaign. I've been so inspired by all the wonderfully talented quilters who have so generously shared their knowledge. When Madame Samm put the call out for Love quilts to fit the adorable table top frame, I knew I wanted to try.

I designed my first table top quilt to show the things I love, my photographer husband, Ken, family, reading books, Maui, scrapbooking and paper crafts, camping, quilting and coffee. I tried applique  as well as fabric painting (the letter m in family and the design in the coffee cup). It was also my first time using freezer paper ironed to fabric, drawing the design on the freezer paper and cutting it out. I loved how the freezer paper helped with some of the more fussy designs.


Once my first was done, I thought I would try to make one that is a adaptation of my blog icon.


I've wanted to try the log cabin style block. I miscalculated the strips needed (the tut I was following made 14 1/2" blocks and I tried to recalculate.. after I sewed it all together, it was too small. I'm definitely still a Wantobe).  I just added two additional white and red strips, so it's not quite a log cabin block.

I haven't learned free motion quilting yet, so I stitched in the ditch. I hope to learn free motion quilting, so I can do some fancy work in the blue of the bunny quilt. I hope you enjoyed my attempts at mini quilts. Be sure to check out all the other blogs for today. The list is in my previous post.

Thanks for stopping by.

Monday, April 16, 2012

Table Top Blog Hop !!

Are you ready for some Inspiration?

Check out the amazing projects!


Table Topper Blog HOP Schedule

APRIL 16th- 25th
Table Topper Blog HOP Schedule

Monday April 16th


Tuesday April 17th


Wednesday April 18th


Thursday April 19th


Friday April 20th


Monday April 23rd


Tuesday April 24th

Wednesday April 25th


Monday, April 2, 2012

Love

It's wedding season so I came up with a few cards. They can be used for weddings, anniversaries, or Valentine's Day.


Tuesday, March 27, 2012

Thank you cards

My DH and I went on a cruise with 6 friends. We used to camp together when we all lived in the Chicago area, but since we moved to Houston that hasn't worked out. Two of the couples have become "winter Texans" and stay in Brownsville Texas from November to April. Unfortunately that is still too far away to camp together as it takes 5 hours to get there. Last year we all decided to cruise together. It has become an "Annual Cruise with Friends" every February.  When you go on a cruise one of the things you do at the end of the cruise is give gratuities to your statesman (cleans your room), your waiter, assistant waiter and the head waiter in the dining room. This year I decided to put the gratuities in Thank You cards, instead of just a plain envelope. I hope they enjoyed the personal touch.

Wednesday, March 21, 2012

Lace Curtains

We decided to change our bedroom. New comforter, decorative pillows, window valances and paint. I wanted my DH to help pick out the new items as he has great taste and he put up with "pretty"  bedrooms for the past 20 years. We found some wonderful brown suede with barbed wire embroidery. Very Texan. Looks great, but DH thought it needed a little feminine touch. He wanted lace panels behind the suede valances at the window. So off to Joann Fabrics to pick up some off white lace to make the panels. Turned out pretty nice.

Sunday, March 11, 2012

I have Finished my 1st Quilt !!

I am sew excited to have finished my first quilt.  I've done 16 blocks toward what I thought would be my first quilt, and planned to make a small quilt once I was finished, for my wheelchair bound Mother-in-Law. I planned to give it to her for her birthday or Christmas this year.  Unfortunately my Father-in -Law passed away this past week and we are flying home Tuesday for the wake and funeral. Fast forward to starting and finishing the small quilt so I can take it with to give to her. I went shopping Saturday to find some charm squares to make disappearing 9 blocks. I purchased fleece as the backing material as my Mother-in -Law really liked a lap quilt my Mom had given me that was backed with fleece.  I want to thank the guest bloggers on Madame Samm's blog SewWeQuilt for the tutorials that helped me with the disappearing 9 block, the sandwiching tutorial and the binding tutorial. I want to thank my sister Dawn for sharing hand applique stitching so I could blind stitch the binding.(quiltingbydawn.blogspot)  I could never have finished my first quilt in a weekend without them.